Security lighting plays a significant role in protecting your property and ensuring overall safety. At Solid Power Inc., we believe smart lighting is not just about brightness; it’s about placing it right where it matters the most and fulfilling its purpose. A lot of homeowners are interested in learning about security lighting installation, but it’s not as simple as it seems. From choosing the right type to planning the layout and wiring it safely, it involves several steps. When these elements come together, your space becomes safer and more responsive. This blog will walk you through each step in an easy way.
From Prep to Power: 8 Easy Steps of Security Light Installation
Do you want to light up dark corners and secure your property without calling an electrician? Follow these eight straightforward steps to install security lighting yourself.
Plan Your Lighting Layout
The first and most important step in security lighting installation is to assess your property’s layout and lighting needs. This step ensures every corner that needs light gets it. Take the time to understand how light coverage and angles will affect your security.
- Identify areas that need illumination, such as entrances, pathways, and dark corners.
- Consider the range and angle of your chosen lights to avoid blind spots.
- Mark exact mounting spots for optimal coverage.
Choose the Right Fixtures
The right light fixtures impact both safety and efficiency. Consider the outdoor conditions and the type of lighting needed. Aim for durable, long-lasting lights that serve your space well.
- Select lights suitable for outdoor use with weather-resistant features.
- Decide between motion-activated or constant-on lighting based on your needs.
- Pick LED bulbs for energy efficiency and longer life.
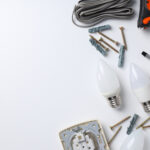
Gather Necessary Tools and Materials
Having the correct tools makes the process smoother and safer. Gather everything before starting so there’s no interruption mid-installation. It also helps to double-check for specific materials recommended by your fixture manufacturer.
- Prepare screwdrivers, a drill, a ladder, wire strippers, electrical tape, and a voltage tester.
- Have mounting brackets, wiring cables, junction boxes, and waterproof connectors ready.
- Ensure you have safety gear such as gloves and goggles.
Turn Off the Power Supply
Our expert electricians suggest that you never work on electrical systems without shutting off the power first. This step is important to protect yourself and your home. Making sure there is no active current prevents injury or equipment damage.
- Locate the breaker panel and switch off power to the installation area.
- Use a voltage tester to confirm there is no live current in the wires.
- Safety first; therefore, never work on live circuits.
Mount the Light Fixtures
With your layout planned and tools ready, it’s time to mount the fixtures. Make sure the lights are positioned securely and aimed to provide maximum coverage. Mounting properly prevents shifting or water entry.
- Secure mounting brackets firmly to walls or ceilings using screws and anchors.
- Attach the light fixtures according to the manufacturer’s instructions.
- Adjust angles for maximum coverage and avoid glare.
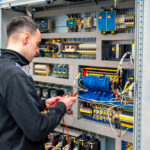
Connect the Wiring
Wiring your lights properly is essential for safe and consistent operation. Take care to match wires correctly and protect them from the elements. Always follow local electrical codes when wiring.
- Strip the wire ends and connect live, neutral, and ground wires appropriately.
- Use wire nuts or connectors to secure the connections.
- Protect the wiring with electrical tape and place it inside junction boxes.
Test the Lighting Setup
Now that the lights are connected, it’s time to see them in action. This step allows you to catch any wiring issues early. Adjust any sensors or settings before completing the install.
- Restore power at the breaker panel.
- Switch on the lights or trigger motion sensors to check operation.
- Adjust sensor sensitivity or light angles if necessary.
Finalize and Secure
The final step is to make everything neat, safe, and weather-resistant. Seal up gaps, clean the area, and check the stability of your installation. A tidy finish improves both appearance and durability.
- Seal all entry points with weatherproof caulking to prevent moisture intrusion.
- Double-check all screws and connections for tightness.
- Clean the fixtures and the surrounding area to complete the job.
Conclusion
In short, with the right preparation and by following these eight straightforward steps, you can enhance your property’s safety and visibility quickly. Taking time to plan, mount securely, and test thoroughly ensures your lighting system works effectively for years. Solid Power Inc. is here to support your journey toward smarter, safer spaces with trusted solutions. Proper security lighting is a valuable investment that adds comfort and peace of mind.
FAQs
- Can I install security lighting myself, or should I hire a professional?
Many homeowners can handle basic installations safely by following instructions, but complex wiring or large setups may require a licensed electrician. - What type of security light is best for outdoor use?
Weatherproof LED lights with motion sensors are energy-efficient and effective for outdoor security lighting. - How high should I mount security lights?
Typically, mounting security lights 8 to 10 feet above ground provides optimal coverage and reduces tampering risks. - Do security lights work well in all weather conditions?
Yes, outdoor-rated lights are designed to withstand rain, wind, and temperature changes if installed correctly. - How often should I maintain or check my security lighting?
Inspect your security lights every six months to ensure bulbs are working and wiring is intact for consistent performance.